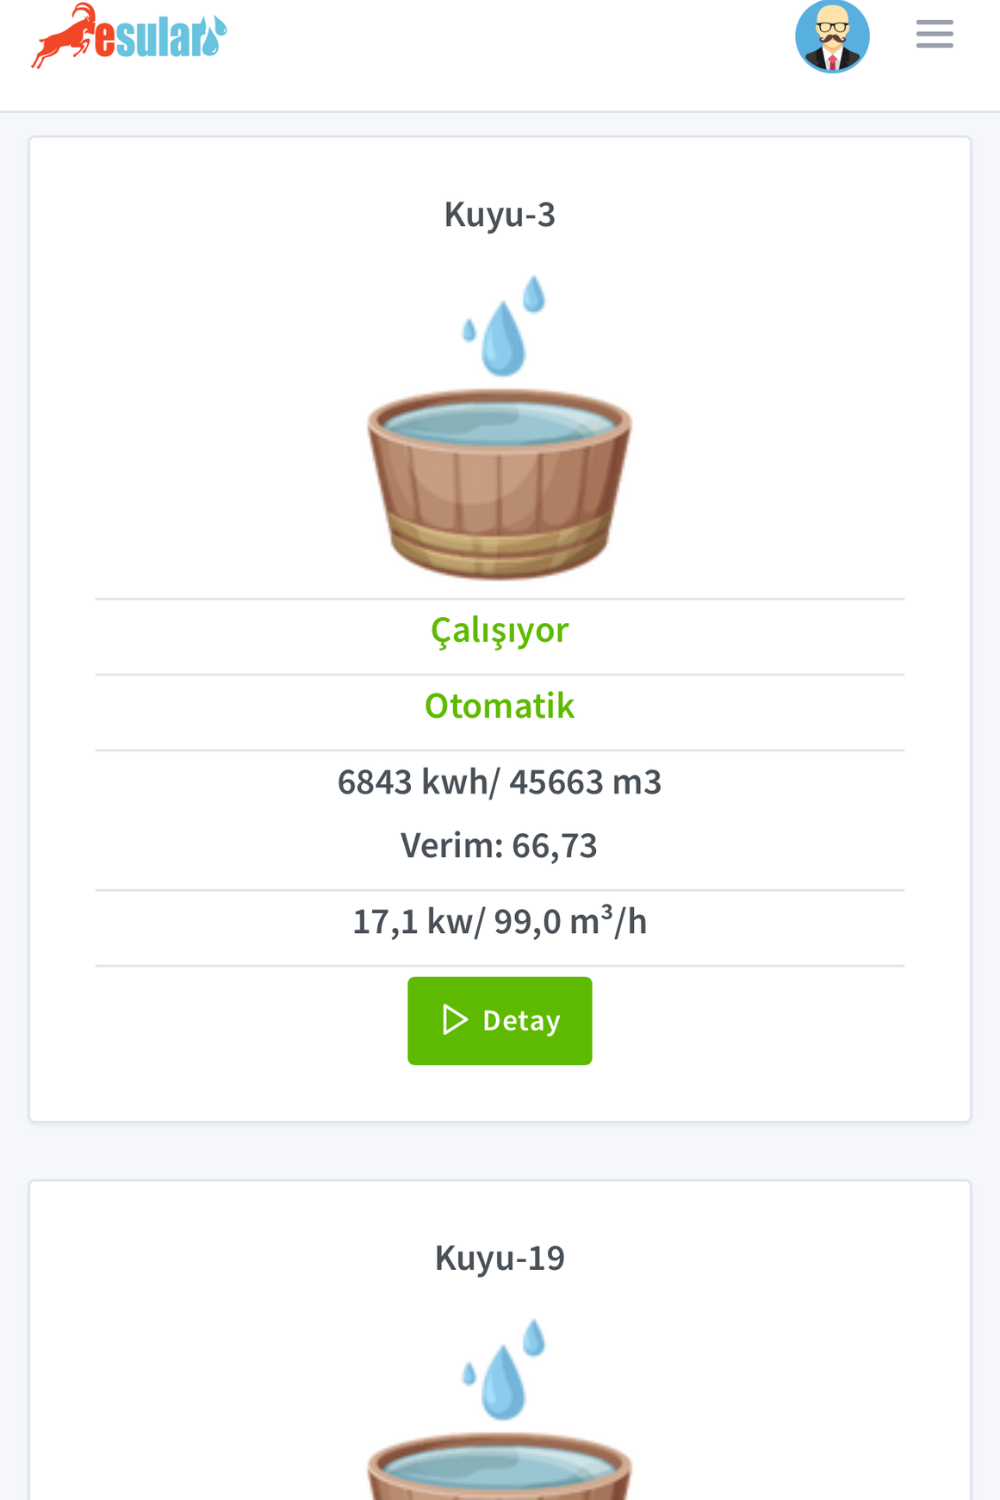
esular Automatic Irrigation System Installation Guide: All Steps from Start to Finish
“How complex is the system? Can I install it? I have no technical knowledge, how will I start?”
Mr. Ahmet had these questions in mind when he decided to install the esular automatic irrigation system on his 150-decare cotton field in Adana. Two days later, while controlling all irrigation from his phone, he said: “It was much easier than I thought. The technical team came, installed it in 3 days, and gave me 1 hour of training. Now I manage everything from my phone.”
In this guide, we will explain the installation of the esular system from start to finish, in all details, with real project photos. Whether you want to do the installation yourself or have the esular technical team do it – understanding how the system works will help you use it more efficiently.
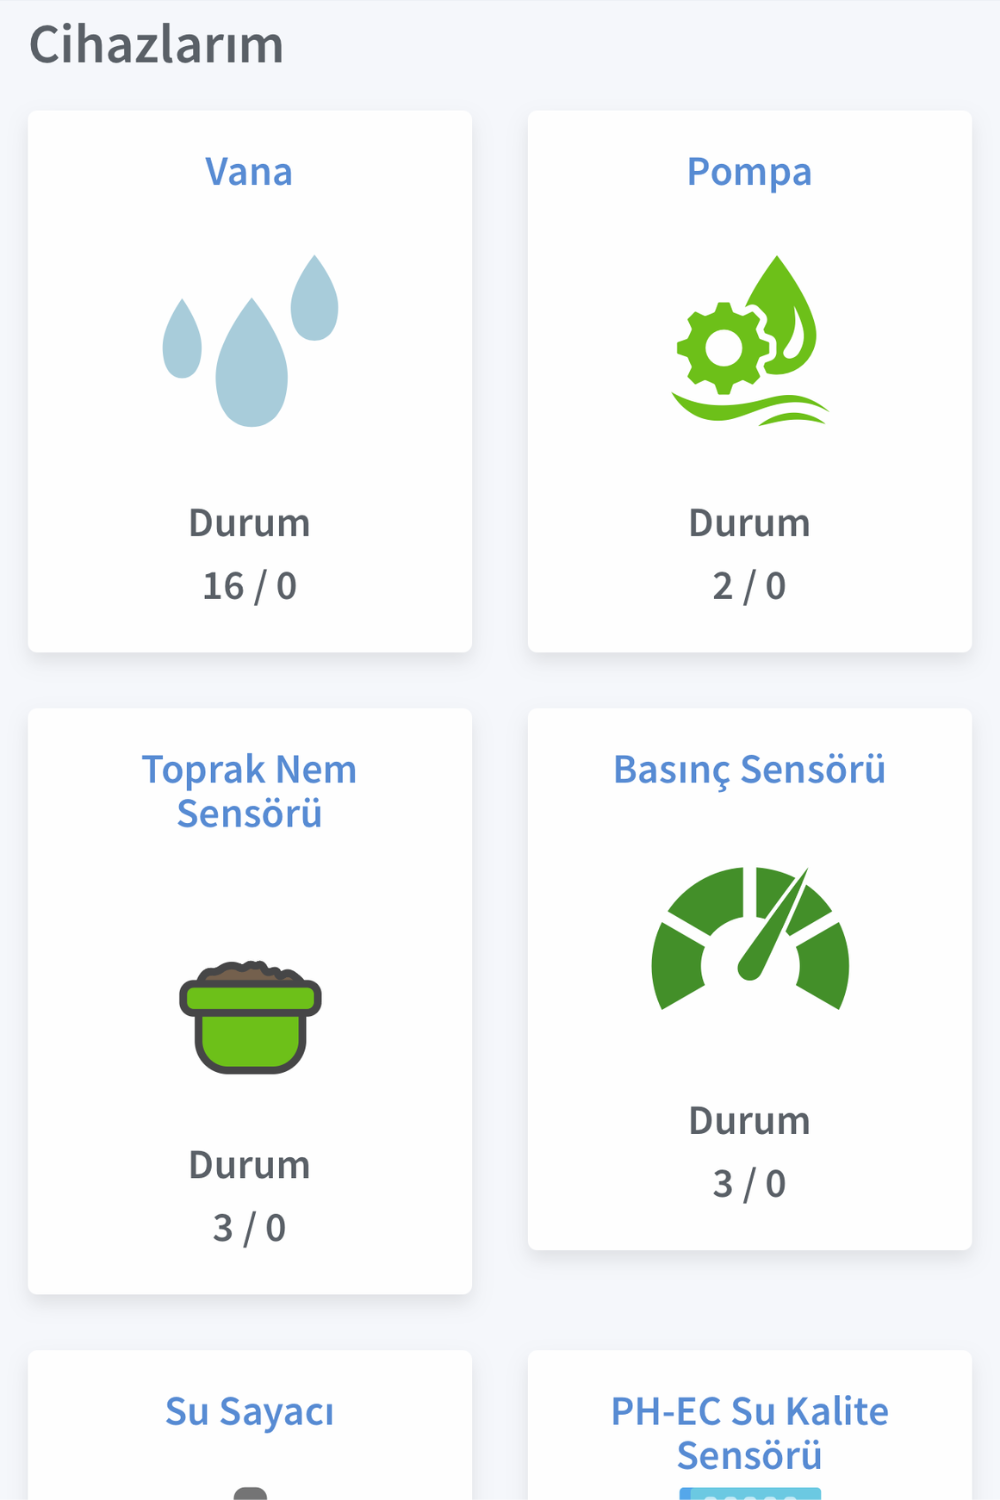
Main Components of the Automatic Irrigation System
The esular automatic irrigation system consists of 5 main components. Let's get to know these first, then move on to the installation:
1. Central Control Station (Gateway)
The brain of the system. The main unit that manages all valves, sensors, and the pump. It connects to the internet via the GSM/4G module and can be controlled from the mobile application.
- F Series: For small/medium enterprises (5-20 valves)
- E Series: For large enterprises and professional solutions (20+ valves)
- Works for 24-48 hours during power outages with internal battery
- Completely energy independent with solar panel option
2. Wireless Valve Control Unit (Smart Valve)
Smart units that remotely open and close automatic irrigation valves. Each unit can control 1, 2, or 4 valves.
- Wireless communication up to 10 km (LoRa technology)
- Solar panel + rechargeable battery
- IP67 waterproof case (suitable for outdoor use)
- Compatible with solenoid valve or motorized valve
3. Solenoid Valve
Automatic irrigation valve that opens and closes with an electrical signal. The mechanical part that controls water flow.
- Diameter options: 3/4″, 1″, 1.5″, 2″, 3″, 4″
- 24V AC or 9-12V DC (Latch) energy options
- Hydraulic or threaded type mechanism
- Pressure resistance up to 10 bar
4. Soil Moisture Sensor
Smart sensor that measures the moisture level of the soil. It ensures irrigation is done exactly as needed.
- Measurement at 3 or 4 different depths (30-60-90-120 cm)
- Carbon fiber tips (stainless, unbreakable)
- IP68 waterproof (can stay underground for a long time)
- Wireless data transmission (up to 5 km)
- Produces its own energy with solar panel + battery
5. Pump Control Unit
Smart module that remotely turns the pump in the well or station on and off, and monitors energy consumption.
- Pump control up to 15 kW
- Pressure sensor integration (dry run protection)
- Water meter connection (flow and consumption measurement)
- Night tariff automation
- Power outage notification
Pre-Installation Preparation: What Do You Need?
For Mr. Ahmet's 150-decare field, the esular technical team first conducted a discovery visit. Here is what needs to be done before installation:
1. Field Discovery and Planning
📋 What Does the Technical Team Check?
- Existing irrigation infrastructure: How many valves are there? Where are they located?
- Water source: Well, pond, or network?
- Electricity status: Is there electricity at the pump head?
- Field size: How many meters is the furthest valve?
- Soil structure: Points where sensors will be placed
- GSM signal: Is there mobile phone reception in the field?
2. Deciding on the System
The following system was recommended for Mr. Ahmet's field:
- 1 F Series Central Control Station (FEx model)
- 4 Smart Valve 2-Output (Total 8 valve control)
- 8 Angled Flanged Hydraulic Solenoid Valves (2″ diameter)
- 2 Soil Moisture Sensors (In different plots)
- 1 Pressure Sensor (On the main line)
- 1 Pump Control Module (For 15 HP well pump)
3. Necessary Materials
Materials needed besides the technical team for installation:
- Poles or tripod (to keep the central station and valve units elevated)
- Locked containers (to protect equipment – optional)
- Cable ties and mounting apparatus (included in the package)
- SIM card (for GSM connection – can be provided by esular)
Step-by-Step Installation Process
Installation in Mr. Ahmet's field took 3 days. Let's look at what was done day by day:
Day 1: Central Station and Pump Control
Adım 1: Placing the Central Control Station
The central station was mounted next to the pump station, 2 meters above the ground. Thus:
- It is protected from floods or water puddles
- It receives better GSM signal
- The solar panel sees maximum sun
⚡ Electrical Connection (Optional)
The central station works for 9-12 hours with internal battery; additionally, if there is continuous electricity:
- Connected to 220V AC input (adapter included)
- Battery is continuously charged
- The system does not stop even if electricity is cut
- Solar panel is not required
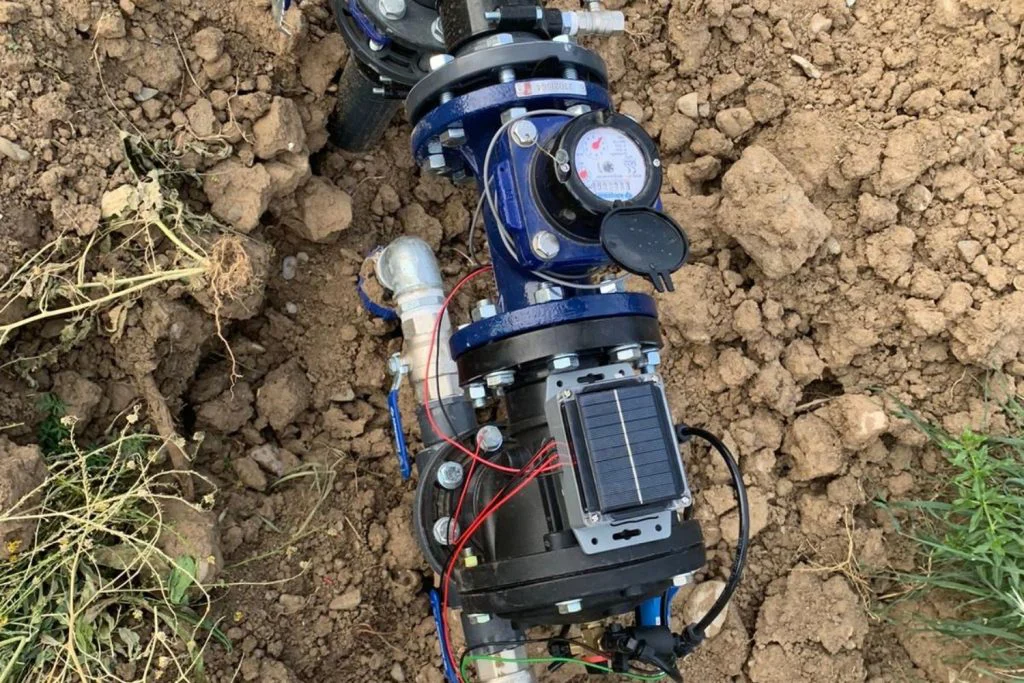
Step 2: Installation of the Pump Control Module
Mr. Ahmet had a 15 HP well pump. The pump control module was connected as follows:
- Integration into the pump electrical panel: The module was connected in series with the pump contactor
- Pressure sensor mounting: Installed on the main pipeline with a T-connection
- Energy analyzer connection: How much electricity does the pump consume? (kWh measurement)
- Wireless communication: Connected to the central station via LoRa (no cables pulled!)
✅ First Test: Running the Pump from the Mobile Application
When the installation was completed, the technical team ran the pump for the first time from Mr. Ahmet's phone:
- The “Turn Pump On” button was pressed in the mobile application
- The pump started running within 2 seconds
- Pressure sensor: showed 4.2 bar
- Instant energy consumption: 11 kW
“That's it! Now you can control your pump from anywhere in the world.”
Day 2: Installation of Valve Control Units
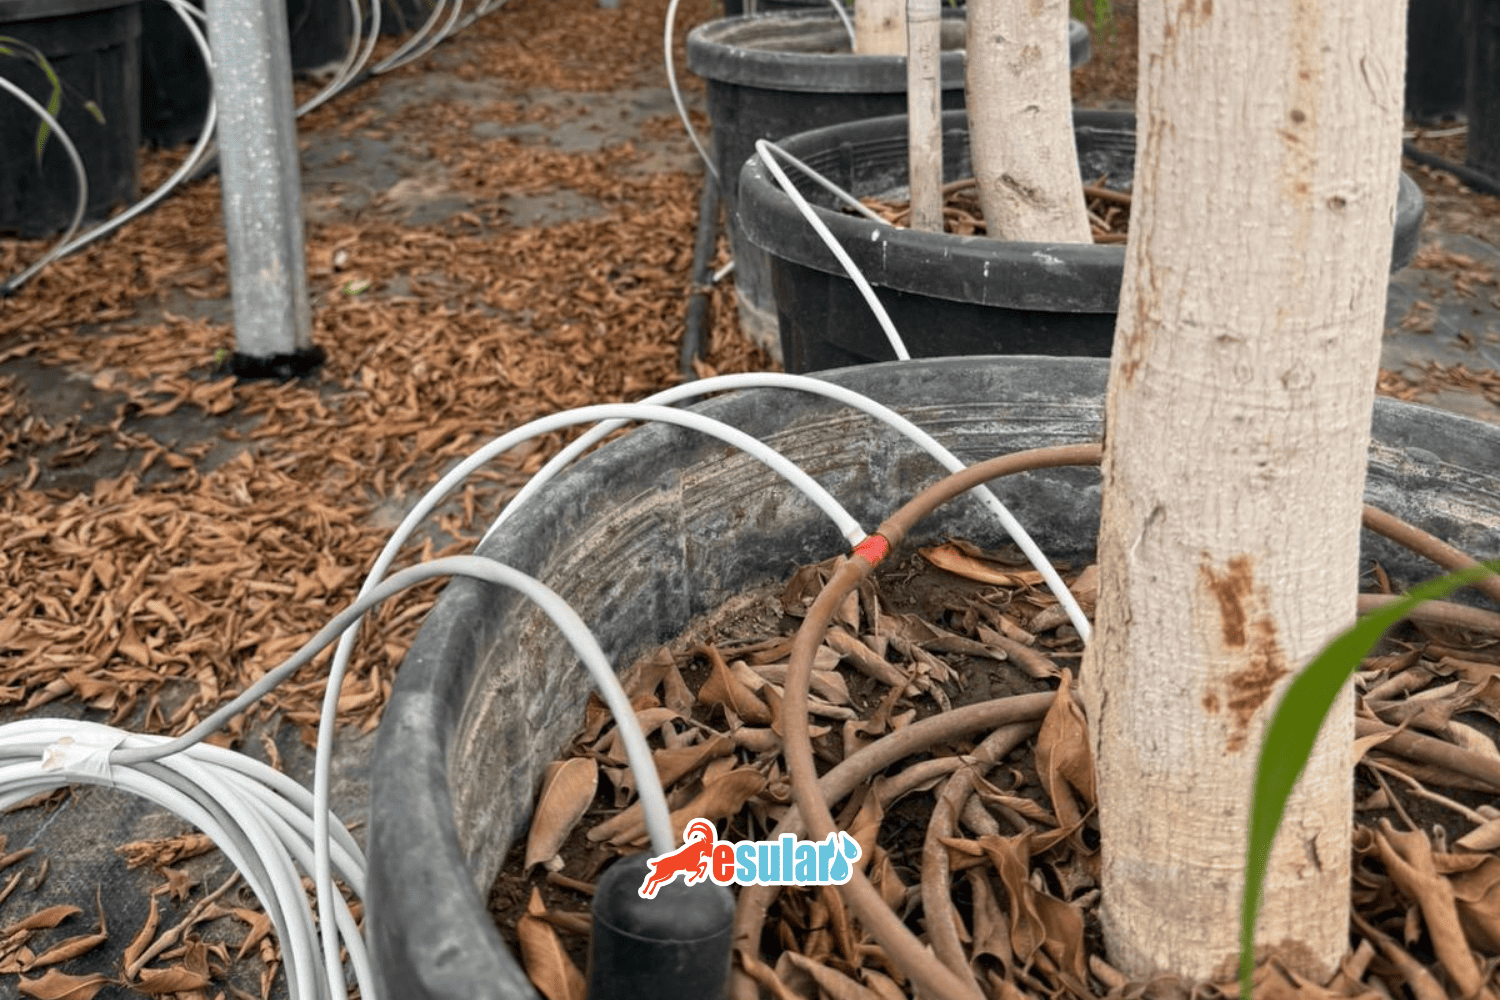
Step 3: Connection of Solenoid Valves
There were 8 manual valves existing in Mr. Ahmet's field. Solenoid valves were installed in their place for automatic irrigation:
- Removal of old valves: Manual valves were removed
- Installation of solenoid valves: Flange-connected valves were mounted on the pipeline
- Gasket and leak control: Carefully checked to ensure no water leakage
- Manual test: Each valve was opened and closed manually, tested for mechanical issues
🔧 Solenoid Valve Selection: Hydraulic or Threaded?
Hydraulic Solenoid Valve:
- Opens/closes with water pressure (energy efficient)
- Low energy consumption (works for a long time with battery)
- Minimum 0.5 bar water pressure required
- Ideal for drip irrigation
Threaded Solenoid Valve:
- Opens/closes with electric motor
- Works even at 0 bar (no water pressure required)
- Faster opening/closing
- For sprinkler and spray systems
Since there was drip irrigation in Mr. Ahmet's system, the hydraulic type was selected.
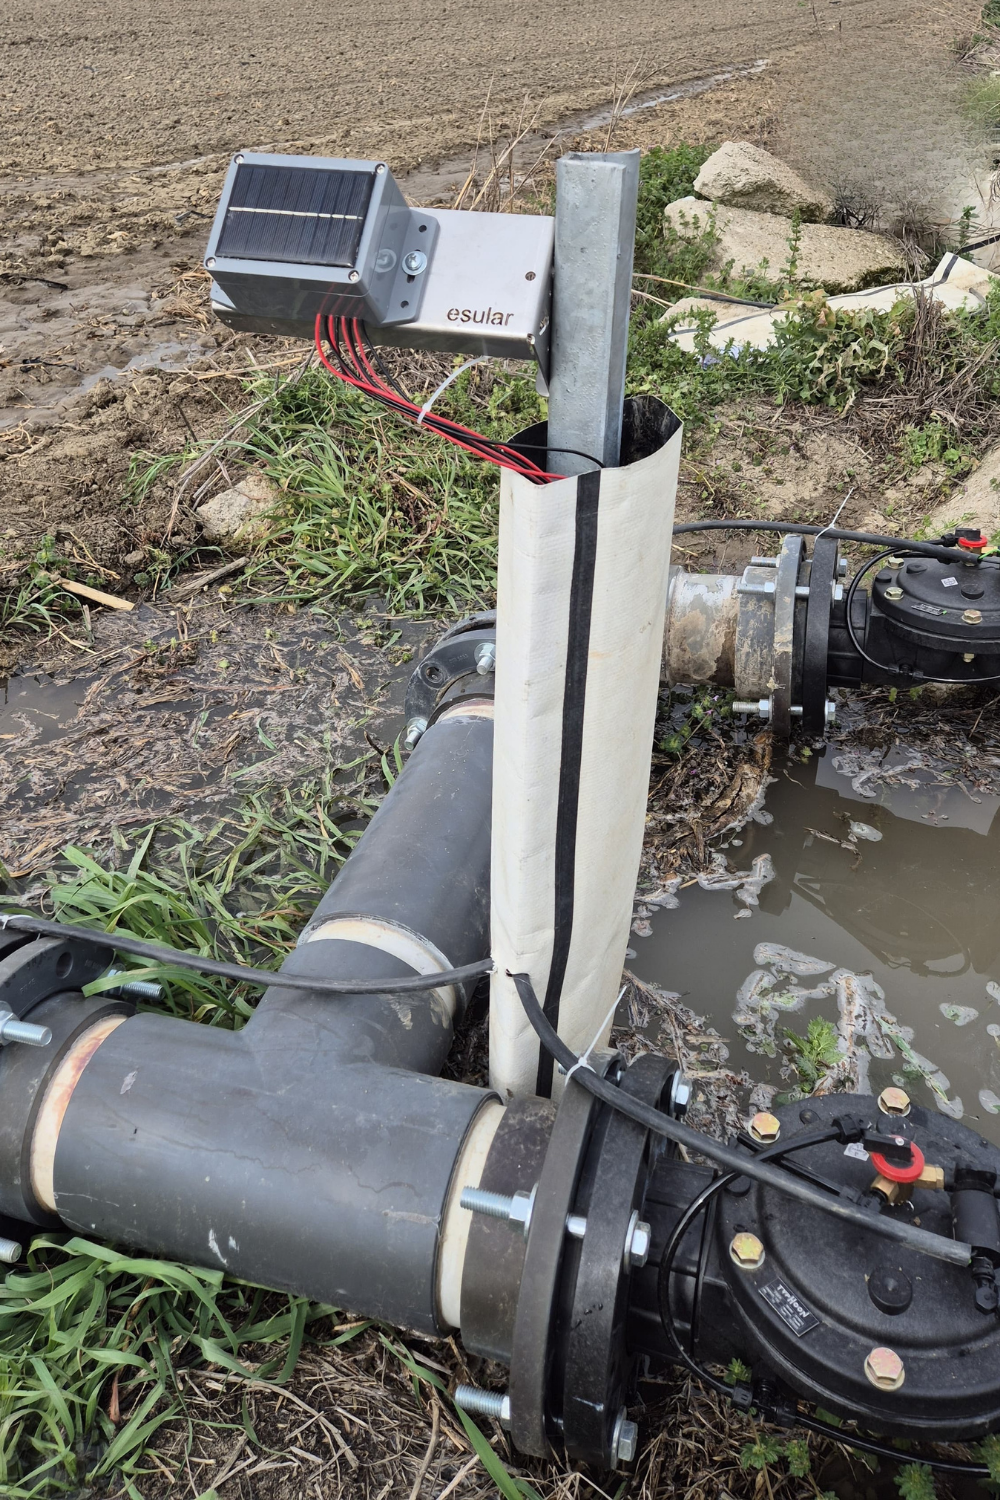
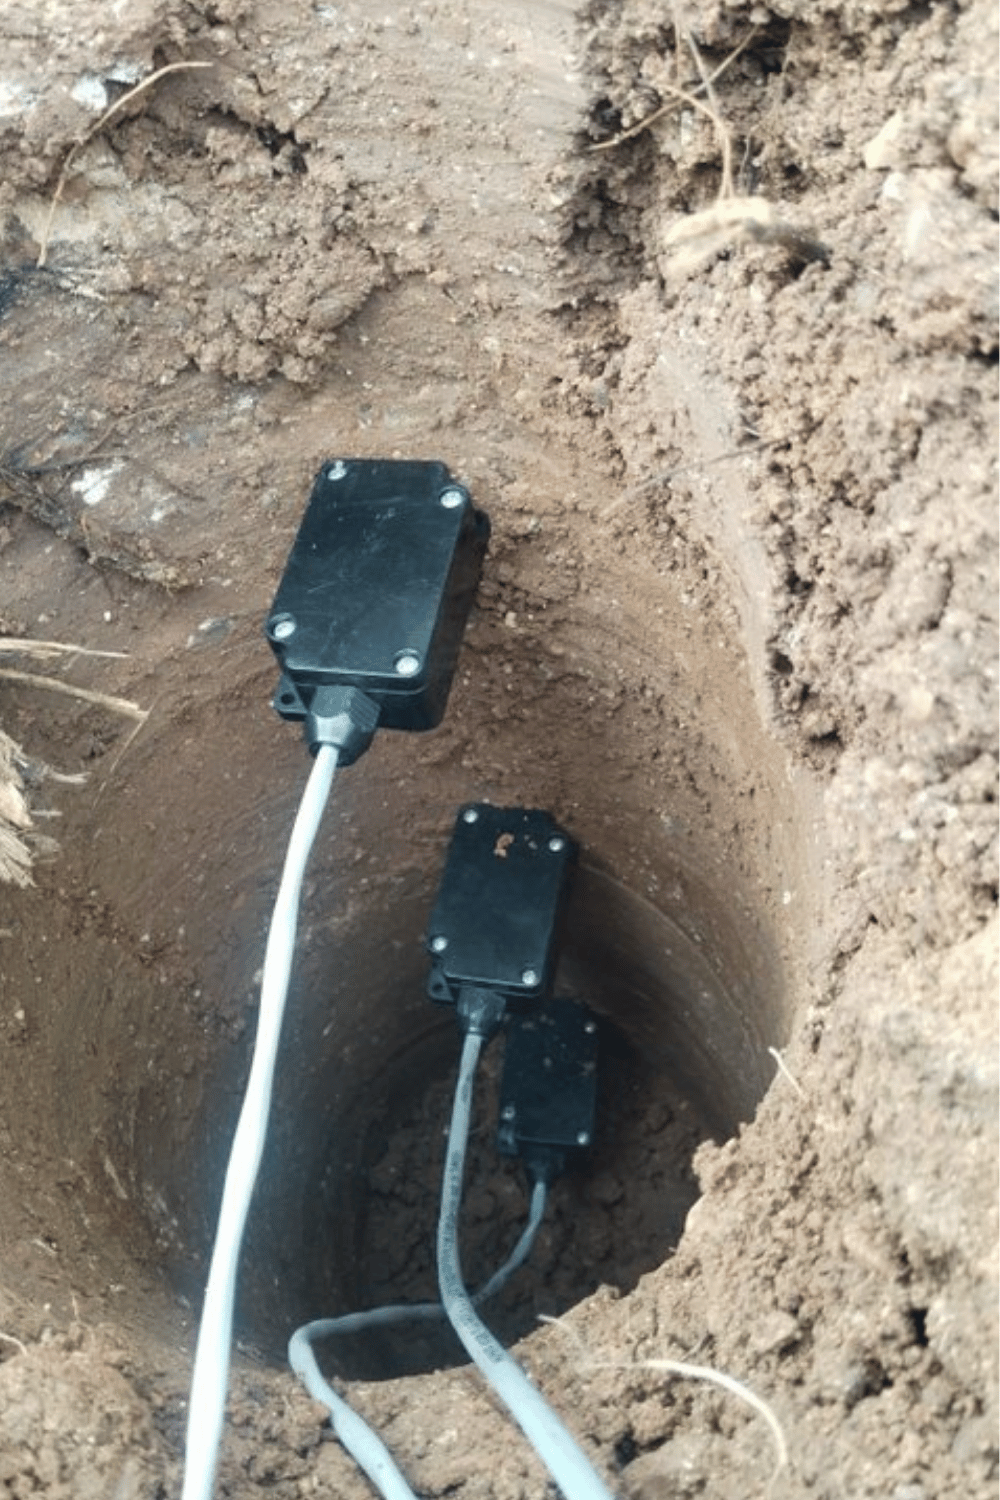
Step 4: Installation of Wireless Valve Control Units
One Smart Valve 2-Output unit was mounted for every 2 valves. The installation is as follows:
- Selection of mounting location: Within 1-2 meters of the valves, on a tripod or pole
- Connecting solenoid valve cables:
- 2-wire connection (non-polarized, no + and -)
- Screw connection terminals (tightening with screwdriver)
- Cable entry closed with waterproof gasket
- Wireless pairing: Automatically connects to the central station via LoRa (5 minutes)
📶 Wireless Connection Test
After each valve unit was installed:
- The technical team sent the “Open Valve 1” command from the mobile app
- The command was transmitted wirelessly from the central station to the valve unit
- The valve opened and water started flowing within 2-3 seconds
- Signal strength: -75 dBm (Very good – within 10 km range)
“The furthest valve was 2.8 km away, there were no issues!” – Mr. Ahmet
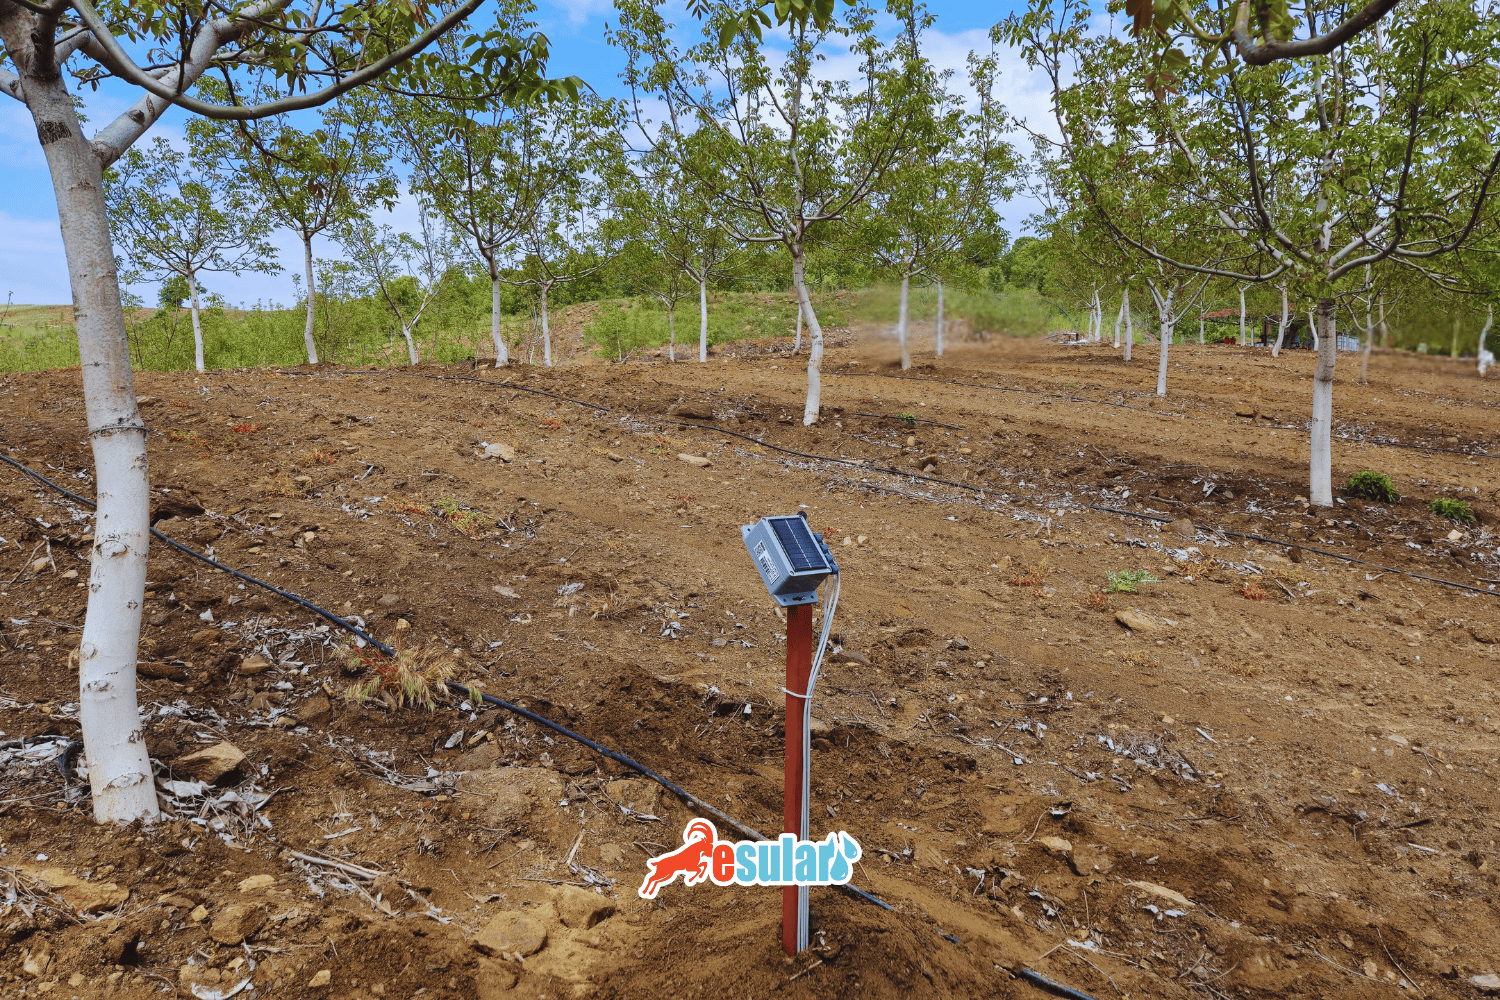
Day 3: Placing Soil Moisture Sensors
Step 5: Determining Sensor Points
Mr. Ahmet's 150-decare field was divided into 2 plots. 1 soil moisture sensor was placed in each plot.
🌱 Where Should the Soil Moisture Sensor Be Placed?
- Middle of the plot: Not the edges, a point representing the average
- Next to the plant row: Not too close, 20-30 cm away
- Flat ground: A point with no slope where water will not accumulate
- Shaded area: Tree shade if possible (for sensor electronics)
- Accessible: Can be reached by vehicle for inspection and maintenance
Step 6: Placing the Sensor into the Soil
The soil moisture sensor is mounted in 4 steps:
- Drilling:
- A hole 120 cm deep was opened with an auger
- Diameter: 8-10 cm (sensor probes are 6 cm)
- Straight and clean hole (no stones, roots)
- Placing sensor probes:
- 4-layer sensor: at 30cm, 60cm, 90cm, 120cm depths
- Probes pushed slowly into soil (careful not to break!)
- Must be in full contact with soil
- Installation of the electronic unit:
- Connected to sensor probes by cable
- Mounted on a tripod or pole at 1.5-2 meters height
- Solar panel facing south
- Wireless pairing:
- Automatically connects to the central station
- First data arrives within 2-3 minutes
📊 First Moisture Measurements
Data seen in the mobile app after sensors were placed:
- 30 cm depth: 42% moisture
- 60 cm depth: 38% moisture
- 90 cm depth: 35% moisture
- 120 cm depth: 33% moisture
“As soil moisture decreases, it automatically notifies the system of the irrigation need. No need for guessing anymore!” – Mr. Ahmet
Installation Completed: Final Checks
At the end of the 3rd day, the technical team performed a full system test:
- ✅ All valves were tested one by one from the mobile application
- ✅ Pump on/off test was performed
- ✅ Checked if soil moisture sensors are sending data
- ✅ Checked if pressure sensor values are correct
- ✅ Automatic irrigation program was created and tested
- ✅ Mobile application user training was provided
Mobile Application First Settings
After the installation was finished, Mr. Ahmet was given 1 hour of mobile application training. Here are the first settings made:
1. Creating a System Map
The map of the field was uploaded to the mobile application. Each valve, sensor, and pump was shown on the map.
2. Naming the Valves
Mr. Ahmet named his valves according to the regions:
- Valve 1 → “North Plot – Rows 1-5”
- Valve 2 → “North Plot – Rows 6-10”
- Valve 3 → “South Plot – Left Block”
- Valve 4 → “South Plot – Right Block”
- … and so on
3. Creating the First Irrigation Program
The technical team created the first irrigation program together with Mr. Ahmet:
🌾 Cotton Field Irrigation Program
Plot 1 (North – 4 valves):
– Monday, Wednesday, Friday
– Time: 23:00 (Night tariff)
– Each valve: 90 minutes
– Condition: If soil moisture is below 35%
– Total: 6 hours irrigation
Plot 2 (South – 4 valves):
– Tuesday, Thursday, Saturday
– Time: 22:30 (Night tariff)
– Each valve: 100 minutes
– Condition: If soil moisture is below 38%
– Total: 6.5 hours irrigation
4. Notification Settings
Mr. Ahmet activated the following notifications:
- ✅ Notify when irrigation starts
- ✅ Notify when irrigation is completed
- ✅ Notify URGENTLY if pressure drops below 3 bar (leak possible)
- ✅ WARN if soil moisture drops below 30% (water stress started)
- ✅ Notify if power outage occurs
- ✅ Notify if pump runs for more than 3 hours (abnormal situation)
Common Installation Errors and Solutions
The esular technical team shares the experience gained from installations they have done for years:
❌ Error 1: Placing Soil Moisture Sensor at Wrong Depth
Problem: Sensor probes are not fully in the soil, they stayed in the air.
Result: Incorrect moisture measurement, soil is 60% moist but sensor shows 20%.
Solution: Open a proper hole with an auger, slowly push probes fully. Fill around the hole with soil and compact it.
❌ Error 2: Mounting Solar Panel in Shade
Problem: The solar panel of the valve control unit stayed in the shade of a tree.
Result: Battery is not charging, system stopped after 1-2 weeks.
Solution: Panel must face exactly south, there should be no obstacles creating shade. If necessary, move the pole higher.
❌ Error 3: Installing Solenoid Valve Backwards
Problem: The arrow mark on the valve shows the flow direction; if installed backwards, the valve will not work.
Result: Valve opens but water does not flow.
Solution: Look at the arrow mark on the valve body, install it so that it is in the same direction as the water flow.
❌ Error 4: Placing Central Station in a Point with Weak GSM Signal
Problem: Central station was placed inside a concrete building where the GSM signal is weak.
Result: System cannot connect to the internet, cannot be controlled from the mobile app.
Solution: Mount the central station in an open area, at a high point (2-3 meters). Use an external antenna instead of the internal one.
❌ Error 5: Installing Pressure Sensor Too Close to Pump Outlet
Problem: Pressure sensor is right next to the pump, in a turbulent area.
Result: Pressure measurement is constantly fluctuating, giving false alarms.
Solution: Install the sensor 2-3 meters after the pump, at a point where there is calm flow. Use a T-connection.
First Week After Installation: Mr. Ahmet's Experience
How did the first week go after the system was installed? Mr. Ahmet explained:
1. Day: I was very excited. I pressed the “Open Valve” button from my phone at breakfast in the morning, the valve 2.8 km away opened. I couldn't believe it!
3. Day: First automatic irrigation started. Notification came at 23:00 at night: “North Plot irrigation started”. I woke up, looked from the phone out of curiosity. Pump is running, valves are open, water is flowing. Everything is perfect. I slept until morning.
5. Day: Soil moisture sensor is a wonder! Moisture dropped in Plot 2, the system suggested automatic irrigation. I approved it, it irrigated from the night tariff.
7. Day: Pressure sensor detected a leak! A pipe joint started leaking, pressure dropped from 4.2 bar to 3.1 bar. I checked immediately, we found a small fault. In the old system, this leak would not have been noticed for weeks!– Mr. Ahmet, Adana
System Expansion: What Can Be Added Later?
The best feature of the esular system: easily expandable. You can add new components at any time after the initial installation:
✨ Extra Valves
Did you buy a new plot? Add a new valve in 5 minutes:
- Mount the new Smart Valve unit
- In the mobile app, “Add New Device” → It finds it automatically and adds it to the system
- Give it a name, include it in the irrigation program
- Ready!
🌡️ Extra Sensors
- Weather Station: Temperature, humidity, wind speed, precipitation amount
- Soil Temperature Sensor: Ideal for seed germination
- EC Sensor: Soil salinity measurement
- Level Sensor: Pool or tank fullness rate
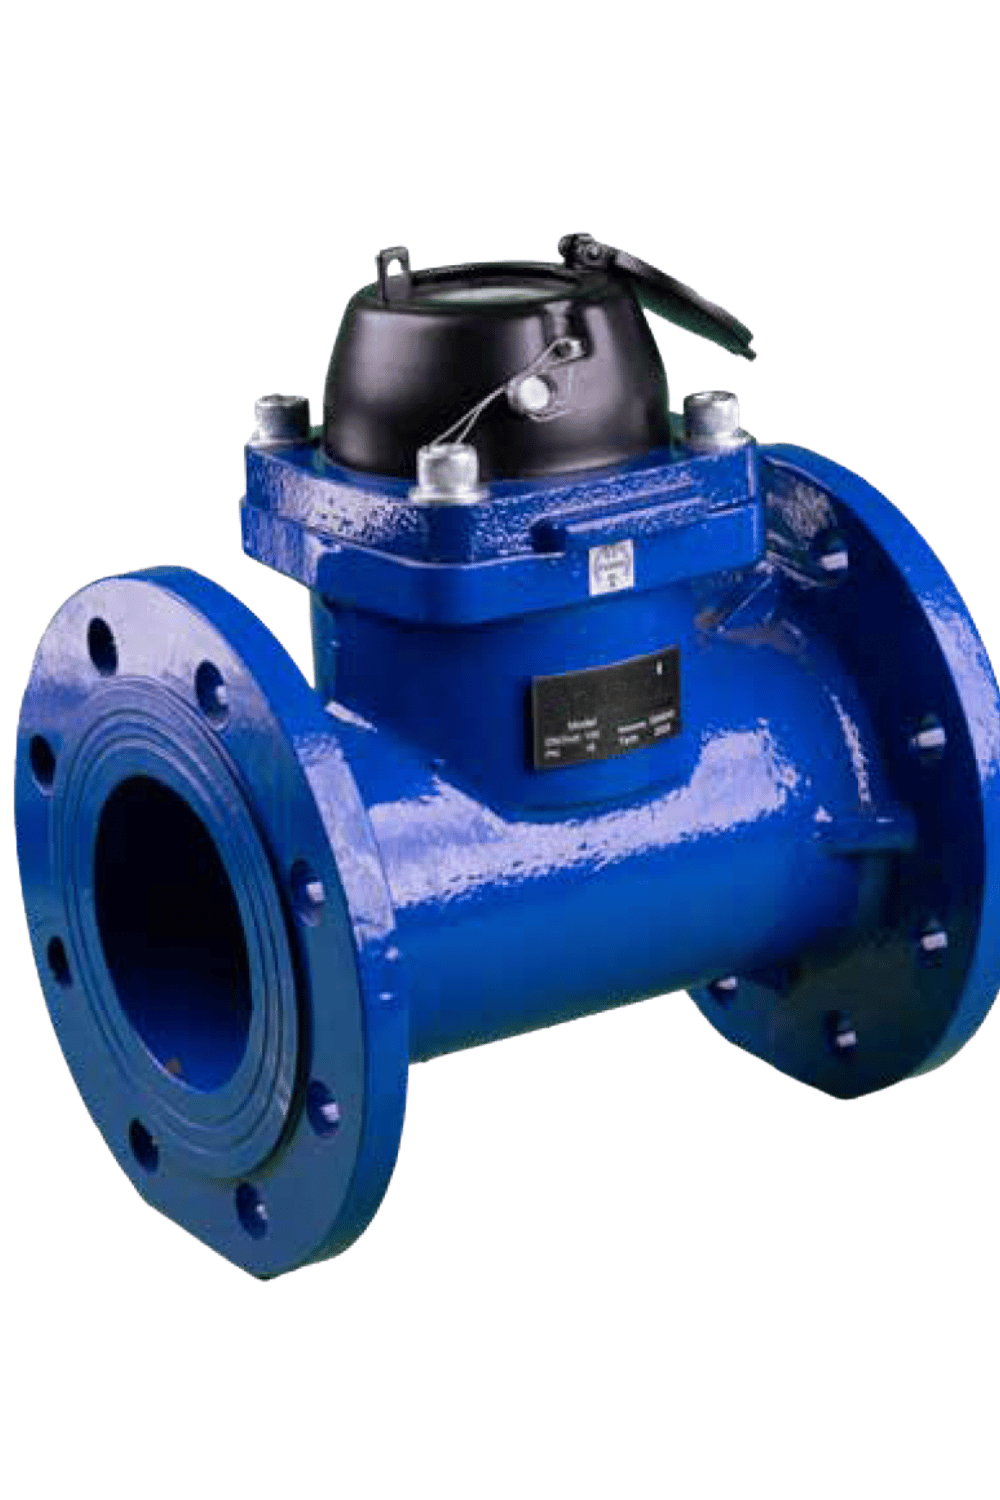
💧 Water Meter
By adding a water meter to each irrigation line:
- Which plot consumes how much water?
- Monthly, yearly water consumption reports
- Excessive consumption alarm (leak detection)
- Comparison between plots
🌱 Fertilization System Integration
For fertigation (irrigation with fertilizer):
- Automatic control of fertilizer tank valves
- Quality tracking with EC and pH sensors
- How much fertilizer was given to which plot?
- Timing: Give fertilizer 10 minutes after irrigation starts
Recommendations for Maintenance and Longevity
esular systems require minimum maintenance, but for long-lasting use:
🔧 Seasonal Maintenance (Start/End of Season)
- Clean the solar panels: If dust or mud accumulates, efficiency drops
- Check solenoid valves: Open and close manually, is there a mechanical problem?
- Tighten connection screws: Vibration and temperature change can loosen them
- Remove and clean soil moisture sensors: Lime or salt accumulation may occur
- Calibrate the pressure sensor: You can reset it from the mobile application
🛡️ Winter Preparation (Frost Protection)
In cold regions during winter:
- Drain the water inside the solenoid valves (prevention of frost bursting)
- Put electronic units into wintering mode (via mobile application)
- Make sure the battery is fully charged
- Do not remove soil moisture sensors, they continue to collect data in winter too
📱 Software Updates
esular regularly releases software updates:
- Mobile application: Automatically updated (Play Store / App Store)
- Central station firmware: OTA (Over-The-Air) update, wireless
- New features are added (e.g., AI-supported irrigation suggestions)
Technical Support and Warranty
esular is with you after installation too:
📞 24/7 Technical Support
- Phone: 0541 247 45 05
- WhatsApp: Instant support
- Mobile Application: Creating a support request
- Remote Connection: If necessary, the technical team can connect to your system remotely
🛡️ Warranty Coverage
- Central Station: 2-year warranty
- Valve Control Units: 2-year warranty
- Soil Moisture Sensors: 2-year warranty
- Solenoid Valves: Manufacturer's warranty (usually 1 year)
- Software Updates: Lifetime
Conclusion: A New Era After Installation
Installing the esular automatic irrigation system is much easier than you think. Thousands of farmers like Mr. Ahmet now:
- ✅ Do not wake up at 5 AM, open the phone and start irrigation
- ✅ Do not have to go to the field every day, 1-2 days a week is enough
- ✅ Reduced water and electricity bills by 35-40%
- ✅ Increased yield by 20% (thanks to regular and correct irrigation)
- ✅ Detect leaks instantly, water waste is prevented
- ✅ Everything is recorded, end-of-season reports are ready
🚀 Switch to Automation!
Get a free discovery and installation quote for your land. Let the esular technical team contact you.
📞 Free Discovery Request 💬 WhatsApp
Or browse all products: store.esular.com
📚 Related Installation Guides
⚠️ Important Notes:
- The installation steps in this guide are for general information purposes. Each project may have its own unique requirements.
- Work with a licensed electrician for electrical work. High voltage is dangerous.
- The installation of esular systems should be done by trained technical staff.
- Use original spare parts to stay within warranty.
- All product prices and features are subject to change. For up-to-date information, visit the esular store.
Yorumlar